Join our community!
Welcome to our awesome team!
We are more than happy to accept external contributions to the project in the form of feedback, translations, bug reports, and even better, pull requests!
Starting from the basics, here we’ll be explaining everything you need to know to contribute in Flyve MDM plugin for GLPI.
Download & New Accounts
You’ll require to install and open new accounts in:
- Download Git
- Download Visual Studio Code
- Download GPG command line tools -> Mac OSX users download GPG suite
- Telegram account
- GitHub account
- Download Keybase if you don’t have an account already.
Set things up
Git
After installing git, run:
git config --global user.name "First.Name Last.Name"
git config --global user.email "my.email@email.com"
Tip
Git provides the Pro Git book, available in several languages, and Try Git, a 15 min tutorial, both very helpful if you’re starting with SCM.
GitHub
For security reasons, we demand our members to have enabled the following Authentication measures. The instructions to configure each one are available from the GitHub Help Documentation, this assures us that any change added to any of our repositories comes from an authorized member of our team.
Tip
We strongly recommend to configure your GitHub account and Git locally, if you are a collaborator, it will increase security to your account and work.
Two Factor Authentication
This is the easiest step, you only need to follow the GitHub Documentation, Securing your account with 2FA, there are several methods to do this, for example by SMS Text or a TOTP app.
Test it!
Sign out then sign in again, GitHub will ask you the Authentication code.
SSH
Follow the GitHub guide, Connecting to GitHub with SSH, there is everything you need to know to successfully add your SSH key.
Test it!
- Create a Test Repository on GitHub
- Create a test directory on your work environment
- From the terminal go to your test directory and run:
git clone git@github.com:MY-USER-NAME/MY-REPO-NAME.git - Run
ls -ato list all directories in test/
If there is a new folder with your repo name, then the setup of SSH was successful!
GPG signing
This configuration requires some patience.
- Open a Terminal.
- Use the following command to create your GPG key:
keybase pgp gen
2.1. Add your information: Name, Email(s)
2.2. Make sure to push an encrypted copy of your secret key to keybase.io
2.3. Add a passphrase to encrypt the key, be sure to remember it since the keychain will request it to save your keys.
- Run the following command
keybase pgp exportand copy everything that starts and ends with:
-----BEGIN PGP PUBLIC KEY BLOCK-----
-----END PGP PUBLIC KEY BLOCK-----
- Add it to your GitHub account, go to settings > SSH and GPG keys > New GPG key
- Get the ID of your PGP key:
- Run
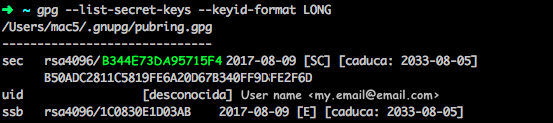
gpg --list-secret-keys --keyid-format LONG- Check your keybase profile
- Tell git about your GPG key, run:
git config --global user.signingkey B344E73DA95715F4
Also run the following commands to sign all commits by default in your current local repository:
git config --global commit.gpgsign true
- Only for Windows:
git config --global gpg.program "C:\Program Files (x86)\GnuPG\bin\gpg.exe"
I already have a GPG key on Keybase
- Sign in from a browser to your Keybase Account.
- Click on the ID of your PGP key.
- Copy and paste the command to import your public GPG key on the terminal:
curl https://keybase.io/MY_USER_NAME/pgp_keys.asc | gpg --import
- Add it to your GitHub account, go to settings > SSH and GPG keys > New GPG key
-----BEGIN PGP PUBLIC KEY BLOCK-----
-----END PGP PUBLIC KEY BLOCK-----
Import your private key to your PC:
5.1. Go to your keybase account on your browser
5.2. Next to your key ID, click on edit and select export private key
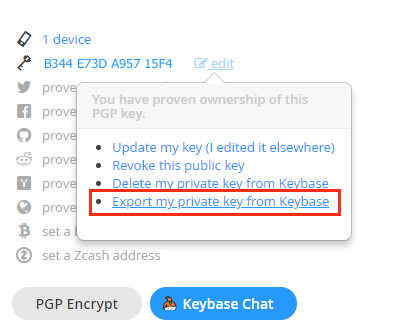
5.3. Copy and paste your private key in a txt editor, and save it with the name
private.key- On Windows make sure it is on your user folder.
5.4. Go to command line and run:
gpg --import private.key5.5. Check the key was imported by running:
gpg --list-secret-keys --keyid-format LONGHere should be listed your key, check the ID from keybase is the same on the sec line.
Tell git about your GPG key, run:
git config --global user.signingkey B344E73DA95715F4
Also run the following commands to sign all commits by default in your current local repository:
git config --global commit.gpgsign true
- Only for Windows:
git config --global gpg.program "C:\Program Files (x86)\GnuPG\bin\gpg.exe"
Test it!
- With your Visual Studio Code open the folder of your cloned repo
- Open the Readme and add a new line to it, for example:
Hello World - Save changes and open the terminal on VS Code:
- On Windows use:
ctrl + ñ- On OSX use: ⌃`
- Run:
git add . && git commit -s -m "my first commit" && git push - Now go to your repo and click on commits, you should see the Verified label.

- Git explanation:
git add .-> Adds the changes to be committedgit commit -s -m "message"-> commits the changes, -s is for signing the commit and -m “message”, the message describing the changesgit push-> pushes the local changes to your remote repo (the repo on GitHub)
Tip
Don’t forget you can learn more about these git commands with the Pro Git book, available in several languages, and Try Git, tutorial.
Note
Make sure that the email address in git, the Primary email in your GitHub account and the one in your GPG key are all the same.
In case you want to add an email account to your GPG, follow this guide Associating an email account with your GPG key
After adding your email account, remember to update your GPG on keybase, to do that, follow these steps:
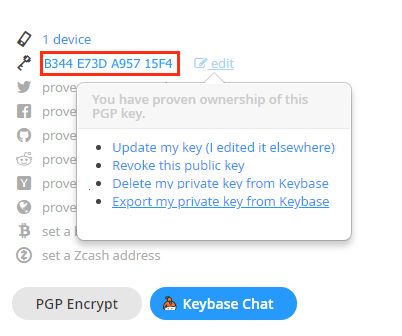
- Sign in from a browser to your Keybase Account.
- Next to your key ID, click on edit and select Update my key (I edited it elsewhere).
- Run again
gpg --armor --export B344E73DA95715F4 - Copy the output and paste it where indicated in keybase.
Now that everything is set up
From the Contributing Guidelines you’ll learn how to make an issue, a PR with your contribution, using the Git Flow, Conventional Commits and the tools we implement.
Attention
The guidelines are mandatory for Contributors, Maintainers and Collaborators.
Inside our repos
Branches
We use the git flow branching model.
We have three main branches in every repository, each one has a specific function:
- Our
masterbranch is for the Long Term Support version. - The
developbranch is for our Bleeding edge version, and finally - The
gh-pagesbranch, where the project site is build using Jekyll.
Continuous Integration
To speed things up and as part of our quality control, we count with automatic processes to run tests for the Pull Requests in our projects and to generate/update the information in the Development section on our gh-pages branches.
Merges in Develop branch
Every time a merge is made in develop the following documentation is generated or updated.
- Code Documentation: the description of every class and function of the source code.
- Coverage: the coverage of the code according to the tests.
- Test Report: the report thrown after all the tests are run.
Merges in Master branch
But when the merge is in master:
- Changelog: the list of commits that either add a fix or a feture, since the last stable version released.
- Releases: create a GitHub release.
Important
- We follow the Standard version for changelogs and the Semantic versioning for the releases.
- According to the projects they might have other deployment tasks besides the ones previously described, you should read the README.md in every
cidirectory to know their specific workflow.